Introduction
The Spiral Tool in Inkscape allows you to create spirals quickly and easily. You can access it by pressing I or Shift+F9, or by clicking the spiral icon in the toolbar.
This tool is perfect for designing coils, decorative elements, or intricate patterns. Using its handles and the Tool Controls Bar, you can adjust the number of turns, inner radius, divergence, and even fill the spiral fully, giving you precise control over its shape and appearance.
Handles of Spiral
When you click and drag on the canvas using the Spiral Tool, the point where you start dragging becomes the center of the spiral. Once the spiral is created, two diamond-shaped handles appear: an Inner handle near the center and an Outer handle at the end of the spiral.

Inner Handle
Dragging the inner handle changes the inner radius of the spiral. It controls how far the spiral starts from the center. By default, the inner handle is placed exactly at the center, meaning the spiral begins from the middle.
Holding the Ctrl key while dragging changes the inner radius in snapped increments.
Holding the Alt key while dragging adjusts the divergence value, which controls the spacing between each turn of the spiral.
To restore the inner handle to its default center position, hold Shift and click on the inner handle.
Outer Handle
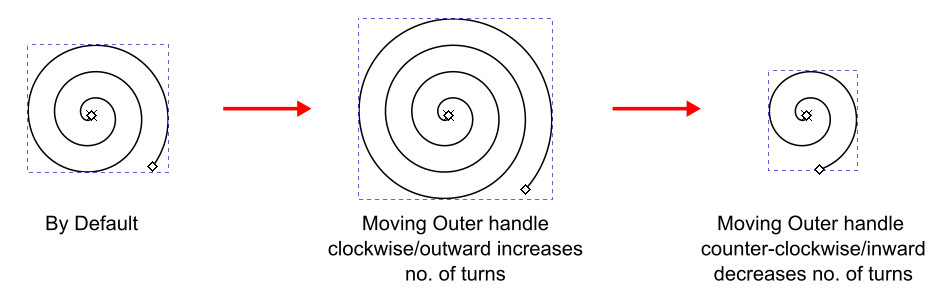
Dragging the outer handle rolls or unrolls the spiral, which means it changes the number of turns. With normal dragging, both the number of turns and the overall size of the spiral change together.
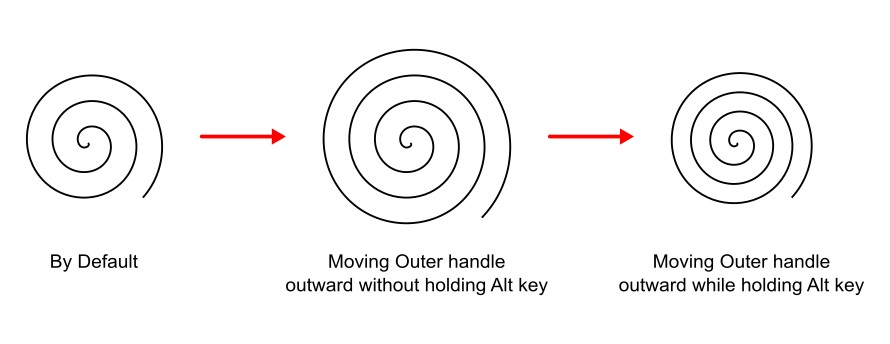
If you hold the Alt key while dragging the outer handle, it locks the radius. This means the overall size of the spiral stays the same, while only the spacing between its turns changes as you adjust the number of turns.
Holding the Ctrl key changes the number of turns in snapped steps.
Holding Shift while dragging allows you to scale and rotate the spiral at the same time. To only rotate the spiral without scaling, hold Shift + Alt while dragging the outer handle.
Transform & Scaling Techniques
Using the Selector Tool
The Selector Tool is the main tool for transforming spirals or any object in Inkscape, including scaling, moving, rotating, and skewing. You can switch to the Selector Tool by pressing the Spacebar, and press it again to return to the Spiral Tool.
If the Selector Tool is already active, double-clicking on an ellipse/circle will also reopen the Spiral Tool.
Using Transform Panel
The Transform Panel in Inkscape provides precise control for moving, scaling, rotating, and skewing objects using exact numerical values. It’s ideal when you need consistent measurements or want to apply the same transformation to multiple objects.
You can open the panel by going to Object › Transform or by pressing Ctrl+Shift+M. Each tab in the panel lets you perform a specific action: Move, Scale, Rotate, Skew, or Transform by Matrix, by entering exact numbers instead of dragging handles manually.
This method is especially helpful for designers who prefer accuracy and want to make subtle adjustments without relying on mouse movements. When working with spirals, it allows you to resize, rotate, or position them precisely to create clean and symmetrical designs.
Spiral Tool Control Bar

Turns
The Turns field controls how many turns the spiral has. You can manually enter any value in the Control Bar to increase or decrease the number of turns. By default, the spiral is created with three turns. As you adjust the number of turns in the control bar, it locks the radius and only changes the spacing between spiral turns; the overall size of the spiral stays the same (like while holding the Alt key with the outer handle).

Divergence
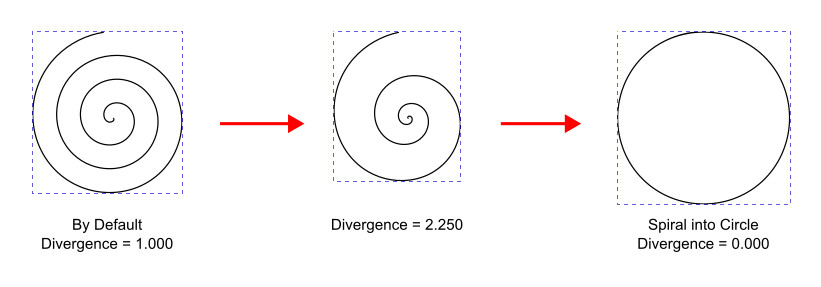
Divergence defines the distance between each turn of the spiral. A value of 1 produces equal and uniform spacing. Values less than 1 tighten the spiral, while values greater than 1 loosen it. The divergence value ranges from 0 to 1000.
A divergence value of 0 turns the spiral into a circle. To reset divergence, type 1 in the Control Bar or hold Alt and click the inner handle.
Inner Radius
Inner Radius controls how far the spiral begins from the center. It can be adjusted either from the Control Bar or by dragging the inner handle directly on the canvas.
The default value is 0, which means the spiral starts from the center. The maximum value is 0.999, which places the start point near the outer handle.
To restore the default inner radius, type 0 in the Inner Radius field or hold Shift and click the inner handle.

Restore Default Shape Again
To reset all spiral settings to their default values, click the Reset Shape Parameters to Default button, the right-most button in the Tool Control Bar.
Spiral Fill Rule
Unlike most shape tools, the spiral is an open path, not a closed shape. By default, it is displayed using only a stroke. You can change its stroke color and style like any other path using the Fill and Stroke Panel.
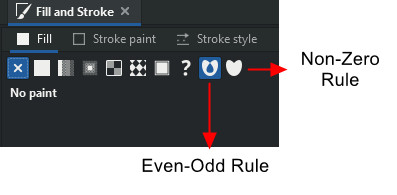
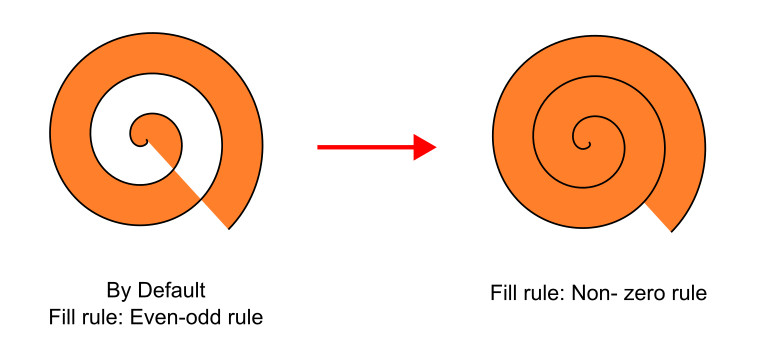
When you apply a fill color, the spiral does not fill completely because Inkscape uses the Even-odd fill rule for open paths by default. To fill the spiral fully, you need to change the fill rule to Non-zero.
Select the spiral, go to Object › Fill and Stroke or by pressing Ctrl+Shift+F, go to the Fill tab, and switch from the half-filled Even-odd icon to the fully filled Non-zero icon. Once changed, the spiral will appear completely filled.
FAQs
Final Thoughts
The Spiral Tool is an easy-to-use tool for creating beautiful spiral shapes in Inkscape. Its inner and outer handles allow precise adjustments of turns, spacing, and radius, while the Tool Controls Bar gives you numerical control for accuracy. Understanding the fill rules ensures your spiral can be fully colored when needed. Once you get comfortable with its handles and settings, designing decorative spirals, patterns, or complex coil shapes becomes fast and effortless.