Introduction
The Ellipse Tool in Inkscape is a second most common shape tool used for creating circles, ovals, arcs, and pie-shaped segments. You can access it quickly by pressing E or F5, or by clicking the ellipse icon in the toolbar.
This tool is perfect for drawing shapes like buttons, badges, pie charts, and circular frames. You can easily resize, rotate, or convert an ellipse into an arc or segment using its handles, its Tool Controls bar, or by using the Transform panel for precise adjustments. Whether you want smooth circles or precise arcs, the Ellipse Tool gives you full creative control with simple adjustments.
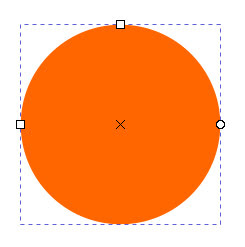
Handles of Ellipse
Square Handles – Resize the Ellipse
The square handles on the top and left sides are used to resize the ellipse. The top handle adjusts the height (vertical size), and the left handle adjusts the width (horizontal size). Simply click and drag these handles to adjust the width and height according to your design needs. This gives you full control over the ellipse’s dimensions directly on the canvas.
If you hold the Ctrl key while dragging the handles, Inkscape will create a perfect circle with equal width and height. If you’ve already drawn an ellipse, you can convert it into a circle by holding Ctrl and clicking one of the square handles. Clicking the top square handle creates a circle based on the ellipse’s height, while clicking the left square handle creates one based on its width.
Circle Handles – Create Arcs or Pie Segments
The circle handles on the right side are used to turn an ellipse into an arc or a pie-shaped segment. There are two handles, one for the arc’s start and one for the arc’s end, but only the arc’s end one is visible at first.
When you drag the visible handle to set the end of the arc, this will make the second handle (for the arc’s start) appear. You can drag both handles to form the desired shape.
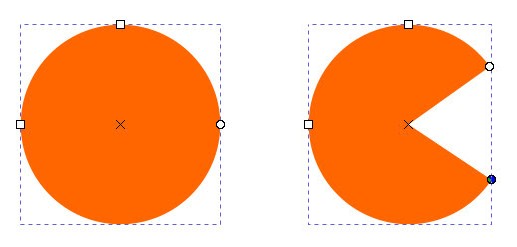
You can use these handles in different ways to create different shapes/arcs:
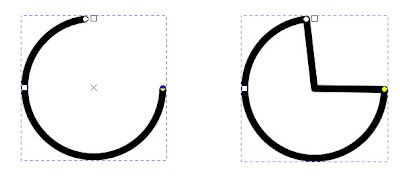
- Arc (open shape): Keep the mouse pointer inside the (imaginary) ellipse while dragging the arc handles.
- Pie segment: Keep the pointer outside the (imaginary) ellipse while dragging the arc handles to form a filled pie segments, like Pac-Man.
Transform & Scaling Techniques
Using the Selector Tool
The Selector Tool is the main tool for transforming ellipse/circle or any object in Inkscape, including scaling, moving, rotating, and skewing. You can switch to the Selector Tool by pressing the Spacebar, and press it again to return to the Ellipse Tool.
If the Selector Tool is already active, double-clicking on an ellipse/circle will also reopen the Ellipse Tool.
Using Transform Panel
The Transform Panel in Inkscape provides precise control for moving, scaling, rotating, and skewing objects using exact numerical values. It’s ideal when you need consistent measurements or want to apply the same transformation to multiple objects.
You can open the panel by going to Object › Transform or by pressing Ctrl+Shift+M. Each tab in the panel lets you perform a specific action: Move, Scale, Rotate, Skew, or Transform by Matrix, by entering exact numbers instead of dragging handles manually.
This method is especially helpful for designers who prefer accuracy and want to make subtle adjustments without relying on mouse movements. When working with ellipses, it allows you to resize, rotate, or position them precisely for creating clean and symmetrical designs.
Ellipse Tool Control Bar

Scaling Options
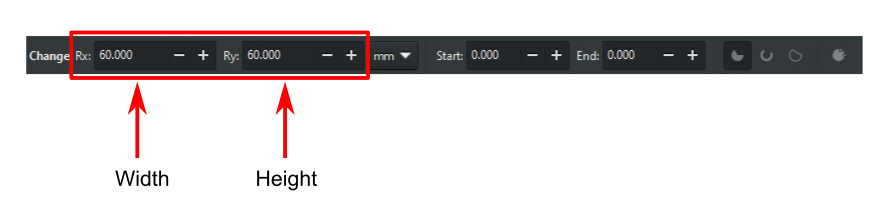
Another way of resizing the ellipse is by changing the horizontal and vertical radius directly in the Ellipse Tool Control Bar. The field labeled Rx is for the horizontal radius (width), and Ry is for the vertical radius (height) of the ellipse. You can also use other alternative Scaling Techniques we discussed earlier.
Unit of Measurement

The drop-down menu shows the current unit of measurement for the ellipse. From this menu, you can change it to another unit like pixels (px), centimeters (cm), inches (in), etc.
Arc or Pie Wedge Options
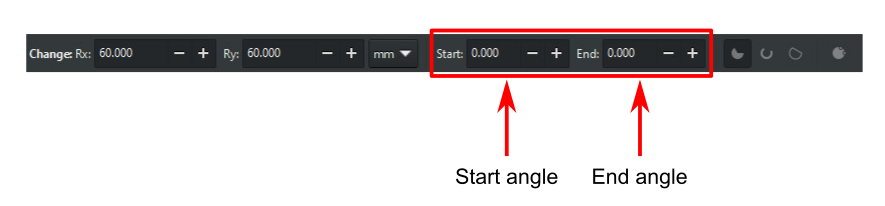
You can create arcs or pie segments by setting the start and end values of arc handles in the Control Bar. In the Tool Control bar, the Start and End fields are used for this purpose. Both indicate the angles (in degrees) between which the pie or arc extends. You can also use circle handles for creating arcs by moving them to the desired position.
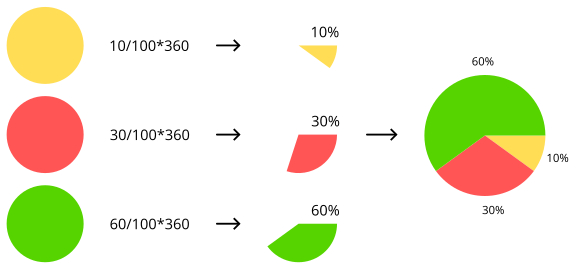
You can also create a pie chart by using a simple formula. Use equation N/100 * 360, where N is the percentage of that pie chart piece. Combine all the pieces to get the complete pie chart.
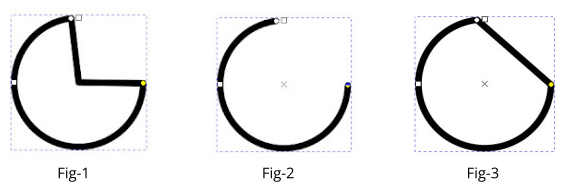
Switching Between Arc, Pie Slice, and Closed Shapes

The three buttons to the right of the Start and End fields are activated when the arc handles are dragged. Or you can say when the value of Start and End is not equal to zero.
- Switches the arc to a pie slice or a closed shape with two radii (as shown in Fig-1).
- Switches a closed shape into an open arc (unclosed) (as shown in Fig-2).
- Switches the open arc into a closed shape (as shown in Fig-3).
Restore the Ellipse Shape again
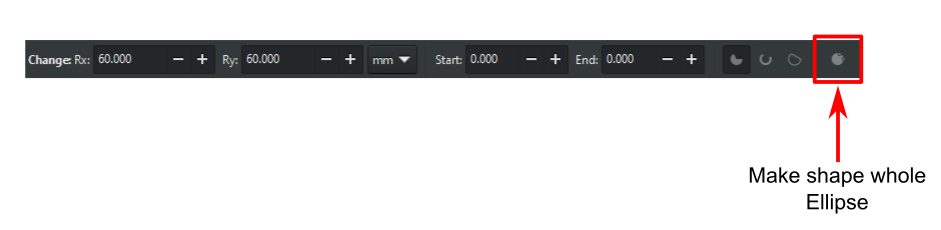
To restore the original ellipse shape, click on the Make the shape whole ellipse button, the right-most button in the Tool Controls bar.
Make a Perfect Circle Using the Ellipse Tool
To create a perfect circle in Inkscape, hold down the Ctrl key while dragging the mouse to maintain equal dimensions. Ctrl is used to preserve the width and height ratio of the object. It creates an ellipse or circle with the same horizontal (width) and vertical (height) radius.
FAQs
Final Thoughts
The Ellipse Tool is one of the most simple yet powerful shape tool in Inkscape. It allows you to create perfect circles, flexible ovals, and even arcs or pie shapes with ease. You can adjust every part of your shape directly on the canvas or use the Tool Controls bar for precision. Once you get familiar with its handles and settings, designing smooth, balanced, and detailed circular shapes becomes quick and effortless.