Introduction
The Pen Tool in Inkscape is used to draw precise lines and curves by placing points on the canvas. Unlike the Pencil Tool, it does not rely on freehand drawing. Instead, you control the shape by clicking to create nodes and dragging to create curves.
You can access the Pen Tool by pressing B or Shift + F6, or by clicking the pen icon in the toolbar.
The Pen Tool is ideal for creating accurate shapes, logos, icons, and clean vector artwork. As it creates vector paths, every line remains fully editable. You can later modify their shape, nodes, curves, color, and thickness.
As a beginner, the Pen Tool may feel complex at first, but with practice, it becomes one of the most powerful and enjoyable tools for creating vector illustrations.
How to Draw Using the Pen Tool
Drawing with the Pen Tool is based on placing nodes.
To draw a straight line, click once on the canvas to place the first node. As you move the cursor, a preview line appears. Click again to place the second node and create a straight segment. Continue clicking to add more connected segments.
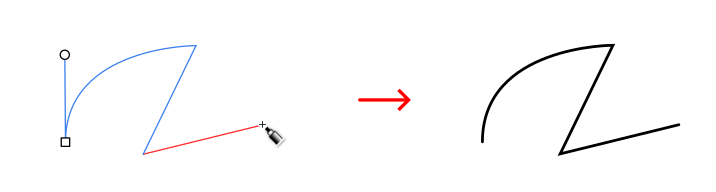
While drawing:
- The red line shows the active segment (not yet finalized)
- The layer color line shows completed segments
To draw a curve, click and drag instead of just clicking. Dragging creates handles that control the direction and shape of the curve.
To finish the path, press Enter, double-click, or right-click on the canvas.
Default Stroke Settings
By default, Inkscape creates a stroke with black color and 1px stroke width. Sometimes, a path may show a fill color. If you don’t want the fill, click the X (no paint) option in the Fill tab.
You can change these settings using the Fill and Stroke Panel.
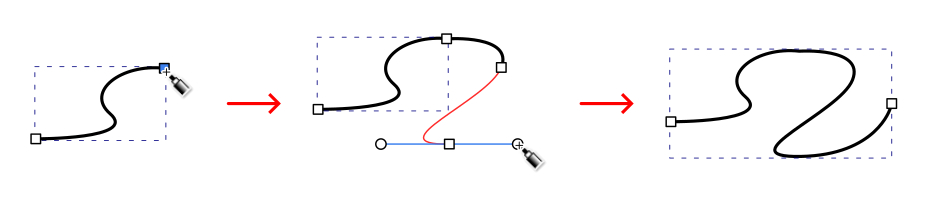
Continuing an Existing Path
Every path created with the Pen Tool has nodes at both ends.
To extend a path, move the cursor over an end node and click to continue drawing. This connects the new segments to the existing path. If you click on a starting node while drawing, it will close the path.
Canceling a Drawing
If you make a mistake while drawing:
- Press Esc to cancel the entire path.
- Press Ctrl + Z to undo after finishing.
- Press Backspace/Delete to remove the last node while drawing. You can press it multiple times to step back node by node.
Drawing Closed Paths and Straight Lines
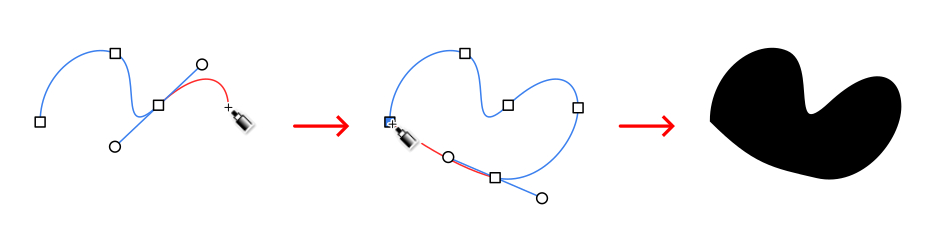
Creating Closed Shapes
To create a closed path, click back on the starting node while drawing. Inkscape will automatically close the path and apply a fill color.
You can change the fill using the Fill and Stroke Panel.
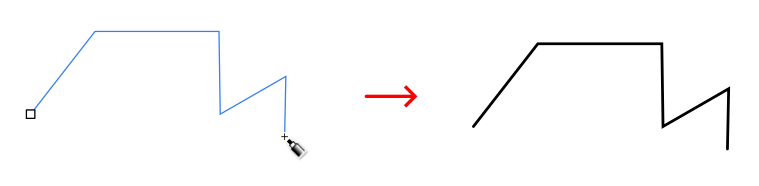
Drawing Straight Lines
To create straight lines, simply click without dragging. Each click creates a straight segment. Hold Ctrl while clicking to restrict angles.
Drawing Curves with the Pen Tool
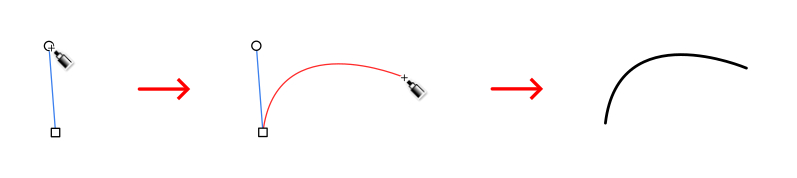
Single Curve
To create a curve, click, hold, and drag on the canvas. While dragging, a handle appears to control the curve’s direction. Release the mouse to form the curve, and a preview line shows the curve shape. Double-click to finish.
Curve and Straight Line Combination
You can combine curves and straight lines in one path.
- Click and drag → creates a curve
- Next click (without dragging) → creates a straight line
This allows flexible shape creation.
Multiple Curves
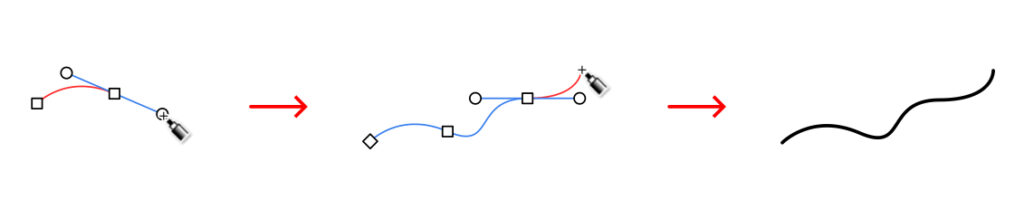
To create multiple connected curves:
- Click and drag for the first curve
- Click and drag again for the next curve
- Repeat as needed
Each node has handles that define the curve, and you can refine them later using the Node Tool.
Pen Tool Control Bar

Drawing Modes
Regular Bezier Path
- The default and most commonly used mode.
- Used to create precise paths with full control over nodes and curves.
Spiro Path
- Creates very smooth and flowing curves.
- This mode automatically adjusts curves and is very useful for creating smooth spirals and artistic shapes.
BSpline Path
- Creates smooth curves with fewer nodes.
- Sharp corners are converted into rounded curves, making it easier to draw smooth shapes.
Straight Line Mode
- Allows only straight segments. Even if you click and drag, it will not create curves.
- Useful for precise straight-line drawings.
Paraxial Mode
- Creates horizontal and vertical line segments.
- Each segment is drawn perpendicular to the previous one, making it useful for technical drawings.
Flatten Spiro and BSpline LPE
Next to the drawing modes, there is a button (button 1 in the toolbar) called Flatten Spiro and BSpline LPE.
LPE stands for Live Path Effect. Live Path Effects are special Inkscape features that allow paths to be modified non-destructively, meaning the original path remains unchanged while the effect is applied dynamically.
When you draw using the Spiro or BSpline mode, Inkscape automatically applies the respective Live Path Effect to the path. You can adjust the path effect easily afterward. This button removes the Spiro or BSpline path effect and converts the live effect into a permanent path, and turns the path into a normal editable path.
Shape and Scale
The Shape option allows you to customize the start and end shapes of a path using the Pattern Along Path effect.
The Scale value controls the width of the shape. Lower values make it thinner, and higher values make it wider. This width can also be adjusted using the Node Tool, where a pink control node appears for editing the shape.
Available shapes include:
None
Standard straight stroke.
Triangle In
Stroke starts thick and ends thin.
Triangle Out
Stroke starts thin and ends thick
Ellipse
Creates a smooth brush-like stroke with thin ends and a wider middle.
From Clipboard
Uses any copied shape to use as a custom brush. Copy shape, select “From clipboard” in shape, and draw to see your custom-shaped brush
Bend from Clipboard
Create deformed copies of curves. Draw a curve, copy it, select “Bend from Clipboard,” and see each line transform.
Last Applied
Reapply the last shape used.
Editing Pen Tool Paths
After drawing, you can edit paths using the Node Tool (N). You can move nodes, adjust handles, fix curves, and add or delete nodes. Even if nodes are not placed perfectly, they can always be corrected later.
Drawing Dots
The Pen Tool can also draw clean dots. To use this feature, select Straight Line Mode or Paraxial Mode.
- Ctrl + Click creates dots of the same size.
- Ctrl + Shift + Click doubles the size of the dot.
- Ctrl + Alt + Click random-sized dots.
FAQs
Final Thoughts
The Pen Tool is one of the most powerful tools in Inkscape for creating precise and professional vector designs. It allows you to build shapes with full control over every node and curve.
Although it may seem difficult at first, it becomes easier with practice. Once you understand how nodes and handles work, you can create clean, smooth, and highly detailed vector artwork efficiently.