Introduction
The Selector Tool in Inkscape is one of the most important tools you’ll use while designing. It helps you select, move, resize, rotate, and skew objects on your canvas with ease. You can quickly access it by using shortcut key S or F1, or by clicking the arrow icon in the toolbar.
This tool is the starting point for most actions in Inkscape. Whether you’re arranging shapes, adjusting text, or organizing your layout, the Selector Tool gives you full control over your design elements. It’s simple, fast, and essential for creating anything in Inkscape. The selector tool is often the first tool new users learn in Inkscape.
How to Transform Objects Using the Mouse in Inkscape
The Selector Tool makes it easy to transform objects with accuracy and control You can use your mouse to perform most transformation tasks directly on the canvas. By clicking, dragging, and combining simple key presses, you can easily move, resize, rotate, and skew objects with visual accuracy. This method is perfect for anyone who prefers hands-on control while designing.
Moving Techniques
Here’s how you can move objects in different ways:
- Left-Click + Drag — Selects and moves an object if it’s not already selected. Dragging a selected object moves it around the canvas.
- Alt + Left-Click + Drag — Moves selected object(s) regardless of where you start dragging. This is useful when moving an object beneath another.
- Ctrl + Left-Click + Drag — Constrains movement to a straight horizontal or vertical line.
- Shift + Left-Click + Drag — Temporarily disables snapping to grids or guides while dragging. (Note: Press Shift after starting to drag for this to work.)
Selection Techniques
Selecting objects accurately is the first step to transforming them effectively. Here are the different selection methods available in Inkscape:
Single Object Selection
Simply Left-Click on any object to select it.
Multiple Object Selection / Toggle Selection
Hold Shift + Left-Click to add or remove objects from your selection.
If an object is not selected, it will be selected by clicking. If it’s already selected, it will be deselected.
You can also select multiple objects by clicking and dragging over the objects, drawing a selection box around them.
Select Object Under Another
If any object is under any other object, use Alt + Left-Click to select the object underneath.
Touch Selection (Drag to Select Multiple Objects)
Hold Alt + Left-Click and drag over the objects you want to select.
All objects touched by the red drag path will be selected automatically. This is useful for selecting partially overlapping shapes.
Selecting Locked Objects
If an object doesn’t respond to clicks, it might be locked.
To unlock all locked objects:
- Go to the Object menu.
- Choose Unlock All.
or
- Open the Layers and Objects Panel.
- Find the locked object and unlock it.
After unlocking, you can freely select and edit them.
Scaling
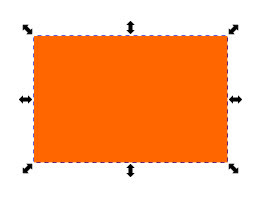
When you select an object using the Inkscape Selector Tool, a rectangle with eight double-headed arrows (handles) appears around it, four at the corners and four on each side.
- Corner handles scale the object both horizontally and vertically.
- Side handles scale the object in one direction only. The left and right sides adjust width (horizontal), while the top and bottom sides adjust height (vertical).
To refine scaling behavior:
- Hold Ctrl to preserve the object’s width-to-height ratio while scaling.
- Hold Shift to scale the object evenly from its center.
- Hold Ctrl + Shift together to scale the object proportionally from its center.
Rotation
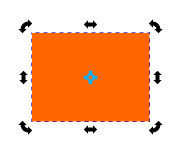
To rotate an object in Inkscape, select it with the Selector Tool and click twice on it, or press Shift + S to switch from scaling mode to rotation mode. You’ll notice that the double-headed arrows around the object change direction.
- Corner handles are used for rotation.
- Side handles are used for skewing the object.
A Left-Click and Drag on a handle will rotate or skew the selected object, depending on which handle you use.
Clicking the object again will switch back to scaling mode.
At the center of the selection, you’ll see a plus sign (+), this is the rotation center. The object rotates around this point, and you can easily change its position by dragging it to a new spot.
For precise rotation control:
- Hold Ctrl to rotate the object by a snap angle (default: 15° per step).
- Hold Shift to rotate around the opposite corner.
- Hold Ctrl + Shift to rotate the object by snap angles around the opposite corner.
Restoring the Rotation Center in Inkscape
If you’ve moved the rotation center and want to return it to its default position (the center of the selection), simply hold the Shift key and click on the rotation center. This will instantly reset the rotation center back to its original spot
Skewing
Skewing allows you to tilt or slant an object to give it a dynamic or angled appearance. In rotation mode, the side handles of the selection box are used for skewing.
For more control while skewing:
- Hold Alt to skew by a snap angle (default: 15° per step).
- Hold Shift to skew the object around the opposite side.
- Hold Alt + Shift to skew by the snap angle around the opposite side.
How to Transform Objects Using the Keyboard in Inkscape
You can also transform objects in Inkscape with just your keyboard. It offers you precise control over objects without using the mouse. You can use the keyboard in Inkscape to move, resize, and rotate a selection, but not to skew it.
Some keyboard shortcuts depend on settings such as the nudge factor, which controls how far an object moves or scales with each key press. To adjust these parameters, go to File → Inkscape Preferences (Shift + Ctrl + P), then open Behavior → Steps and modify the values according to your needs.
Moving Techniques
On the Canvas
- Arrow Keys — Move the selected object by the default nudge factor (2 pixels by default).
- Shift + Arrow Keys — Move the selection by 10 times the nudge factor (20 pixels by default).
- Alt + Arrow Keys — Move the selection by 1 screen pixel. At 100% zoom, this equals exactly 1 pixel.
- Alt + Shift + Arrow Keys — Move the selection by 10 screen pixels. At 100% zoom, the selection moves 10 pixels.
In Layers
- Page Up — Raise the selected object one step up in the stacking order.
- Page Down — Lower the selected object one step down.
- Home — Bring the selection to the top of the current layer.
- End — Send the selection to the bottom of the current layer.
Selection Techniques
- Ctrl + A — Selects all objects in the current layer.
- Ctrl + Alt + A — Selects all objects in all layers (excluding hidden or locked items).
- Shift + 1 (!) — Inverts the selection in the current layer, swapping selected and unselected objects.
- Alt + Shift + 1 (Alt + !) — Inverts the selection across all visible and unlocked layers.
- Esc — Deselects all selected objects.
Scaling
When scaling objects using the keyboard, the transformation occurs around the center of the bounding box.
- . or > — Increases the object’s size by 2 pixels (default scale step).
- , or < — Decreases the object’s size by 2 pixels (default scale step).
- Ctrl + > — Increases the object’s size by 2×.
- Ctrl + < — Decreases the object’s size by 2×.
Rotation and Flipping
When rotating objects using the keyboard, the rotation occurs around the object’s rotation center.
- ] — Rotates clockwise by the snap angle (default: 15°).
- [ — Rotates counterclockwise by the snap angle.
- Ctrl + ] — Rotates 90° clockwise.
- Ctrl + [ — Rotates 90° counterclockwise.
- H — Flips the object horizontally.
- V — Flips the object vertically.
Switch Between the Selector Tool and Object Tool
To quickly toggle between the Selector Tool and the active Object Tool (for example, if you have selected a rectangle and you want to switch to the Rectangle tool from the Selector Tool or vice versa), press the Spacebar.
Each press of the Spacebar switches you back and forth between the two tools.
Selector Tool Control Bar

Selection Options

- Select all objects in the current layer
- Select all objects in all layers
- Deselects any selection
- Toggle selection box, when enabled, select all objects that are touched by clicking and dragging over them. Otherwise, only those inside the dotted box are selected.
Rotation Options

- Rotate objects 90° counter-clockwise
- Rotate objects 90° clockwise
- Flips the object horizontally
- Flips the object vertically
Object Positioning in Layers Options

- Raise selection to the top of the current working layer
- Raise selection one step up
- Lower selection one step down
- Lower selection to the bottom of the current working layer
Custom Positioning and Resizing Options

There is another way to set the location of an object on the canvas. In the Tool Control bar, the X and Y fields are used for this purpose. X is used for setting the horizontal coordinates and Y is used for setting the vertical coordinates.

Another way of resizing the selected object is by changing the width and height in the Tool Controls. The field labeled W is for the width, and H is for the height of the selection.
The lock icon between W and H is used to scale the selection by the same proportion when enabled.

The drop-down menu shows the current unit of measurement for the Selector Tool. From this menu, you can change it to other units like pixels (px), centimeters (cm), inches (in), etc.

- When enabled, stroke width scales by the same proportion while scaling objects.
- When enabled, the radii of rounded corners scale by the same proportion while scaling rectangles.
- When enabled, move the gradients along with the object, whether it’s in the fill or stroke of the object.
- When enabled, move the patterns along with the object, whether it’s in the fill or stroke of the object.
FAQs
Final Thoughts
The Selector Tool is one of the most essential and frequently used tools in Inkscape. Whether you’re arranging shapes, resizing objects, or rotating elements precisely, this tool helps you control your designs with accuracy and ease. You can use both the mouse and keyboard to transform objects in different ways, depending on your preference. Once you get comfortable with these shortcuts and techniques, working with objects in Inkscape becomes much faster and smoother.