Introduction
The 3D Box Tool in Inkscape allows you to create realistic three-dimensional boxes using perspective. You can access it quickly by pressing X or Shift+F4, or by clicking the box icon in the toolbar.
While drawing a box is easy, understanding how its axes, handles, vanishing points, and perspective settings work is essential for full control. This article explains how the 3D Box Tool functions, including its axes, handles, control bar options, and different types of perspectives.
By the end of this guide, you will understand how to resize and move a 3D box correctly, control its perspective using vanishing points, switch between one-point, two-point, and three-point perspectives, and create isometric boxes for technical or illustrative designs.
Axis
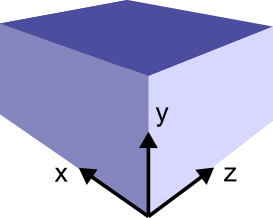
The 3D Box Tool creates three-dimensional boxes in Inkscape, so every box is defined using three axes: X, Y, and Z. Inkscape uses color-coded lines to make these axes easy to understand. The red lines represent the X-axis, the blue lines represent the Y-axis, and the yellow lines represent the Z-axis.
These axes play a key role in controlling the perspective of the box. Each axis is linked to a vanishing point, and together they decide how the box appears in 3D space. By adjusting the vanishing points or axis directions, you can make the box look wider, taller, deeper, or tilted in a different direction.
Handles of 3D Box
Diamond/Corner Handles – Resize the Box
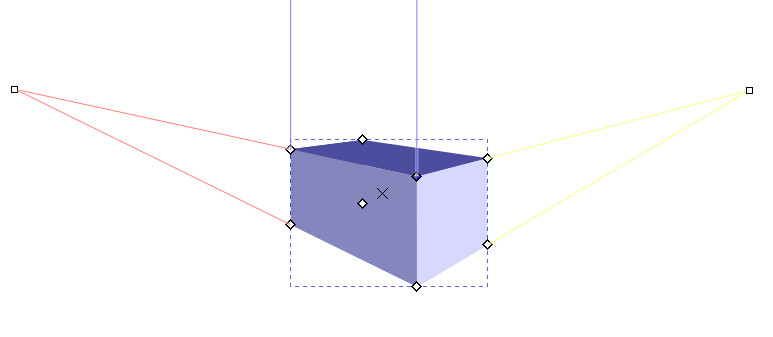
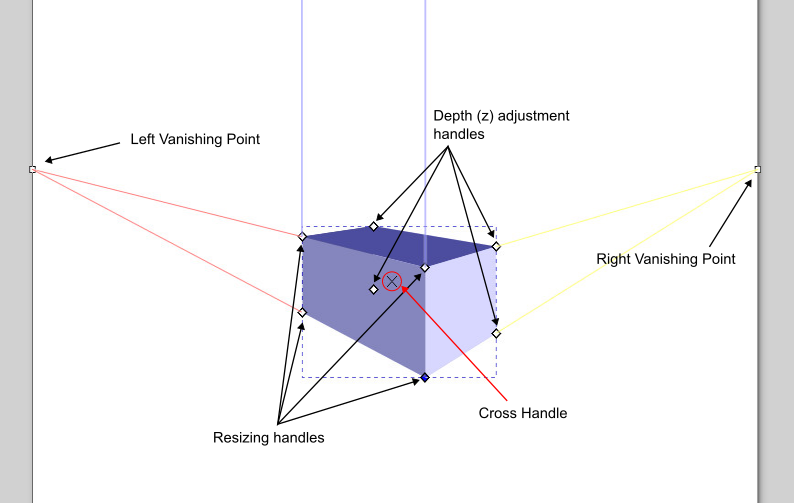
When you draw a 3D box, eight diamond-shaped handles appear at its corners. The front four handles (shown in Figure 1) are used to resize the box in the X and Y directions. Dragging any of these handles resizes the box along the red (X) and blue (Y) axes. All four handles perform the same function, so you can use whichever is convenient.
Holding the Ctrl key while dragging restricts the movement to one direction at a time, either X or Y.
The remaining four corner handles control the depth of the box along the Z-axis (yellow lines).
If you hold the Shift key, the behavior of these handles switches. The front four handles resize the box in the Z-direction instead of X-Y, while the back four handles resize it in the X-Y plane.
Square Handles – Vanishing Points
The square handles outside the box represent the vanishing points. A 3D box can have up to three vanishing points, one for each axis, depending on the perspective used.
By default, Inkscape draws a box using two vanishing points, which is known as a two-point perspective (shown in the figure-1). These are usually placed along the X and Z axes. When you hover over a vanishing point, the status bar shows it is a finite vanishing point, meaning it can be moved freely.
Initially, vanishing points are placed along the page borders, but you can drag them anywhere to change the perspective.
You may notice that the Y-axis has parallel blue lines instead of a visible vanishing point. This means the Y-axis is set to infinity. For any point that is set to infinity, its direction is given by an angle value. Its angle can be set from the Tool’s Control Bar. By default, it is 270°.
Cross Handle – Move the Box
The X-shaped handle (shown in the figure-1) in the center of the box is used to move the entire box while keeping the same perspective. This allows you to reposition the box without disturbing the vanishing points or axis alignment.
Why not use the Selector Tool for moving a box?
When working with 3D boxes, it’s important to move and resize them using the 3D Box Tool itself. Unlike regular shapes, using the Selector Tool will move both the box and its vanishing points, which can break the intended perspective.
For this reason, always use the 3D Box Tool handles when scaling or repositioning a box to maintain proper perspective.
3D Box Tool Control Bar

The Tool Controls bar contains Angle X, Angle Y, and Angle Z fields. These are used to define the direction of each axis when its vanishing point is set to infinity.
Next to each angle field is the Parallel Lines (||) button. When this button is enabled, the corresponding axis is set to infinity, and its direction is controlled by the angle value instead of a visible vanishing point.
By default, the Parallel Lines (||) button for y is on. This indicates that y is set to infinity, and you can set its direction by typing the value in the Angle Y field. By default, its angle is set to 270°. You can change it by simply typing any value from 0° to 360°.
Note that the direction for each x, y, and z is only enabled when you set the vanishing point to infinity. Otherwise, this option is disabled, and you can find the vanishing point on your canvas and adjust it by simply dragging it.
Types of Perspectives
As we discussed earlier, the 3d box tool is used to draw boxes from different perspectives. There are three types of perspectives: 1-point perspective, 2-point perspective, and 3-point perspective. Let’s discuss each perspective one by one, and how the type of perspective can be changed from the control bar for any box.
1-Point Perspective
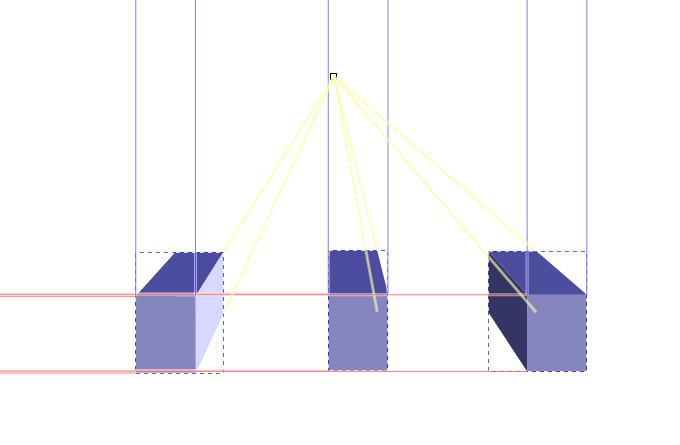
One-point perspective uses one vanishing point. It is used to show how things appear to get smaller as they get further away. To create a box in a one-point perspective, you have to set two points to infinity.
For example, set the X and Y vanishing points to infinity by enabling the X and Y Parallel Lines (||) buttons in the controls bar. Set Angle X and Y to define directions, like set Angle X to 180° and Angle Y to 90°. Disable the Parallel Line button (||) for Z, and drag the vanishing point to the desired point (typically near the center of the drawing). If you extrude in the Z-direction, you will see that the box is becoming smaller as it goes further away.
2-Point Perspective
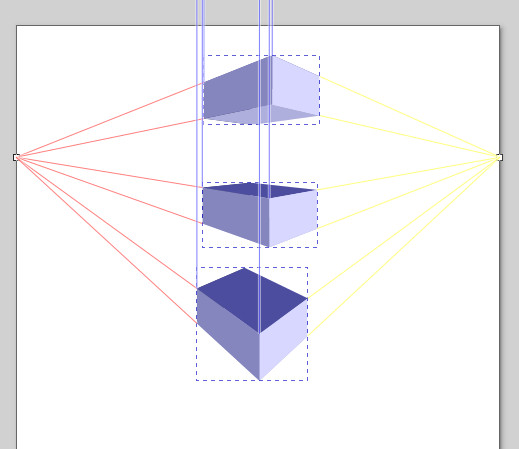
Two-point perspective is the default perspective. It uses two vanishing points. It is used to draw buildings or interiors. To create a box in a two-point perspective, you have to set one point to infinity.
For example, set the Y vanishing point to infinity by enabling the Y Parallel Lines (||) button in the control bar. Set the Angle Y, for example, to 90°. Disable Parallel Lines (||) buttons for X and Z, and drag vanishing points to the desired places (generally they are at the same level on opposite sides of the page). If you scale the box in X and Z directions, you will see that the box is becoming smaller as it goes further away.
3-Point Perspective
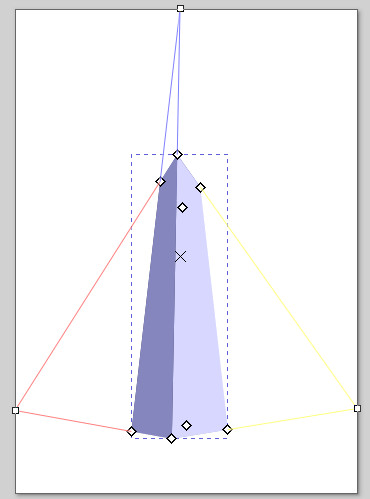
Three-point perspective uses all three vanishing points. The three-point perspective is often used for buildings seen from above or below. To create a box in a three-point perspective, enable all vanishing points by disabling the Parallel Lines (||) button for all X, Y, and Z.
You may not see the Y point on page borders in the first place. The reason is that it has placed itself outside the page. If you zoom out, you will find it. Drag vanishing points to the desired places. Generally, X and Z are at the same level but on opposite sides, and the Y vanishing point is on the opposite side, either below or above the box, depending upon your need. If you scale the box in the Y-direction, you will see that the box looks like a tall building that is becoming smaller as you see further.
Isometric Projection
There is another way to visualize a 3d object in a 2d plane. This is called isometric projection. Isometric projection is different from perspective drawing. In this mode, all three axes are set to infinity, meaning no vanishing points are used. The angles between the axes are equal, and objects remain the same size no matter how far they appear.
To create an isometric box, enable the Parallel Lines (||) buttons for X, Y, and Z, and set their angles (for example, 150°, 90°, and 30°). This view is commonly used in technical, engineering, and game-asset illustrations.

Attributes of 3D Box
A 3D box consists of six sides, all grouped by default and shaded in blue. To select an individual side, hold Ctrl and click on it. To select a hidden side, hold Ctrl + Alt and click.
You can also select individual sides from the Layers & Objects panel. Once selected, each side can be styled, moved, or transformed using the Selector Tool.

At first, all sides are grouped and working with the 3D box tool. You can also ungroup (Ctrl + Shift + G) the sides of a box.
Remember, when a box is ungrouped, it is no longer a 3D Box shape; it will be converted into a path. You can not edit it using the 3D Box Tool.
FAQs
Final Thoughts
The 3D Box Tool is a powerful yet easy-to-use feature in Inkscape for creating perspective-based shapes. By understanding its axes, handles, vanishing points, and control bar settings, you can quickly create and modify 3D boxes without breaking their perspective. Once you are comfortable with these basics, the 3D Box Tool becomes an efficient way to design structured objects, isometric drawings, and realistic layouts directly inside Inkscape.